I finally received my tenure letter yesterday. It's just a shame that it's now meaningless because of the state's new evaluation model. Oh well, if we ever run out of toilet paper at Casa de Brewer, I can put that letter to some use.
"Oh, awesome! I have tenure! Now I won't have to prepare for three observations this year." Um, yeah. Right. Now I get to prepare for at least four--even though I have only positive feedback in my file, great observations in the past, high test scores, and happy parent recommendations. That's your tax dollars at work, people--paying extra people to come in and perform unnecessary extra observations on people who are already getting the job done.
And what, you might ask, did I do upon receiving my notice of tenure? Blow off school and go out to celebrate? Decide that I have job security and just "phone it in" for the the rest of the year? Or even the rest of the week?
No. Actually I didn't even phone it in for the rest of the day. I stayed at school writing lesson plans until 6:00 p.m. (two hours past my contracted time--for those of you keeping score at home--after I'd arrived an hour before my contracted time started that morning). The only reason I left at 6:00 is because we had Bible study at 6:30 and I still had to eat dinner. The next day I came in early again, stayed late again, and have been grading papers at home on a Friday night for 5 hours. I'm only about halfway finished, in case you were wondering.
Tomorrow I get to go to school to decorate my door for Red Ribbon Week, which is our county's Drug Free event for Just Say No (to drugs and alcohol). Seriously. I am a professional with a Master's degree, and I have to go in off the clock to hang butcher paper on my door. It's enough to make me want to say yes to drugs and alcohol.
But regardless of all the insanity that is currently running amok in education, I officially have tenure.
Whoopdee-freakin'-do.
Friday, October 21, 2011
Thursday, October 13, 2011
What I Did on Fall Break (part two)
For my next trick...
I had two other projects working this week: one that was really easy and one that made me cuss. The easy one first. My 14 year old has had the same dresser set since he was still living in my belly and I filled it with baby clothes. Back then his clothes fit in the dresser drawers. Now, not so much.
I've been checking Craigslist every night and yard sales every weekend trying to find one tall (5-6 drawer) chest of drawers to replace the 4-drawer chest and 6-drawer long dresser that he has now, but I haven't found anything that I like which I can also afford. So, unfortunately for now, he's stuck with his kid-sized furniture to hold his man-sized clothes. But also unfortunately, they were fugly. They were scuffed and scratched and had these really awful fake brass drawer pulls. Well, see for yourself:

Old English Scratch Cover and Rust-oleum Oil Rubbed Bronze spray paint to the rescue. Both of those products are must-haves for me. I've used the Old English scratch cover on so many things--to erase a bunch of minor scratches in furniture when we moved, and more recently, to help me restore a Bombay Company jewelry chest which I've seen on Ebay and other sites for $100, that I scored at a yard sale for $5 this summer. It was in pretty rough shape, but with a little sanding and elbow grease and Old English, it is beautiful again.
Rust-oleum Univeral paint and primer in one is my go-to for anything that needs to be replaced when I can't afford to replace. Seriously, this stuff has saved me bundles of cash. I've painted (in two different houses) bathroom light fixtures , towel bars, toilet paper dispensers, drawer and cabinet pulls (see bathroom cabinet makeover, next), hinges, my metal (fake iron) bed, metal wall art, decorative crosses, picture frames, and probably some other stuff that I can't remember right now. I love this paint. It looks black at first glance, but when the light catches it, it gives off this really pretty glowy, gold-flecky, sparkly sheen that is so lovely.
So, back to the dresser. It's not a huge change (at least it doesn't show up well in the pictures), but it's enough that I can live with the chest of drawers a little while longer until I find something better. And then when I sell the old ones on Craigslist, somebody will get a less fugly pair for their kid's room. Win, win. Here is the finished product:
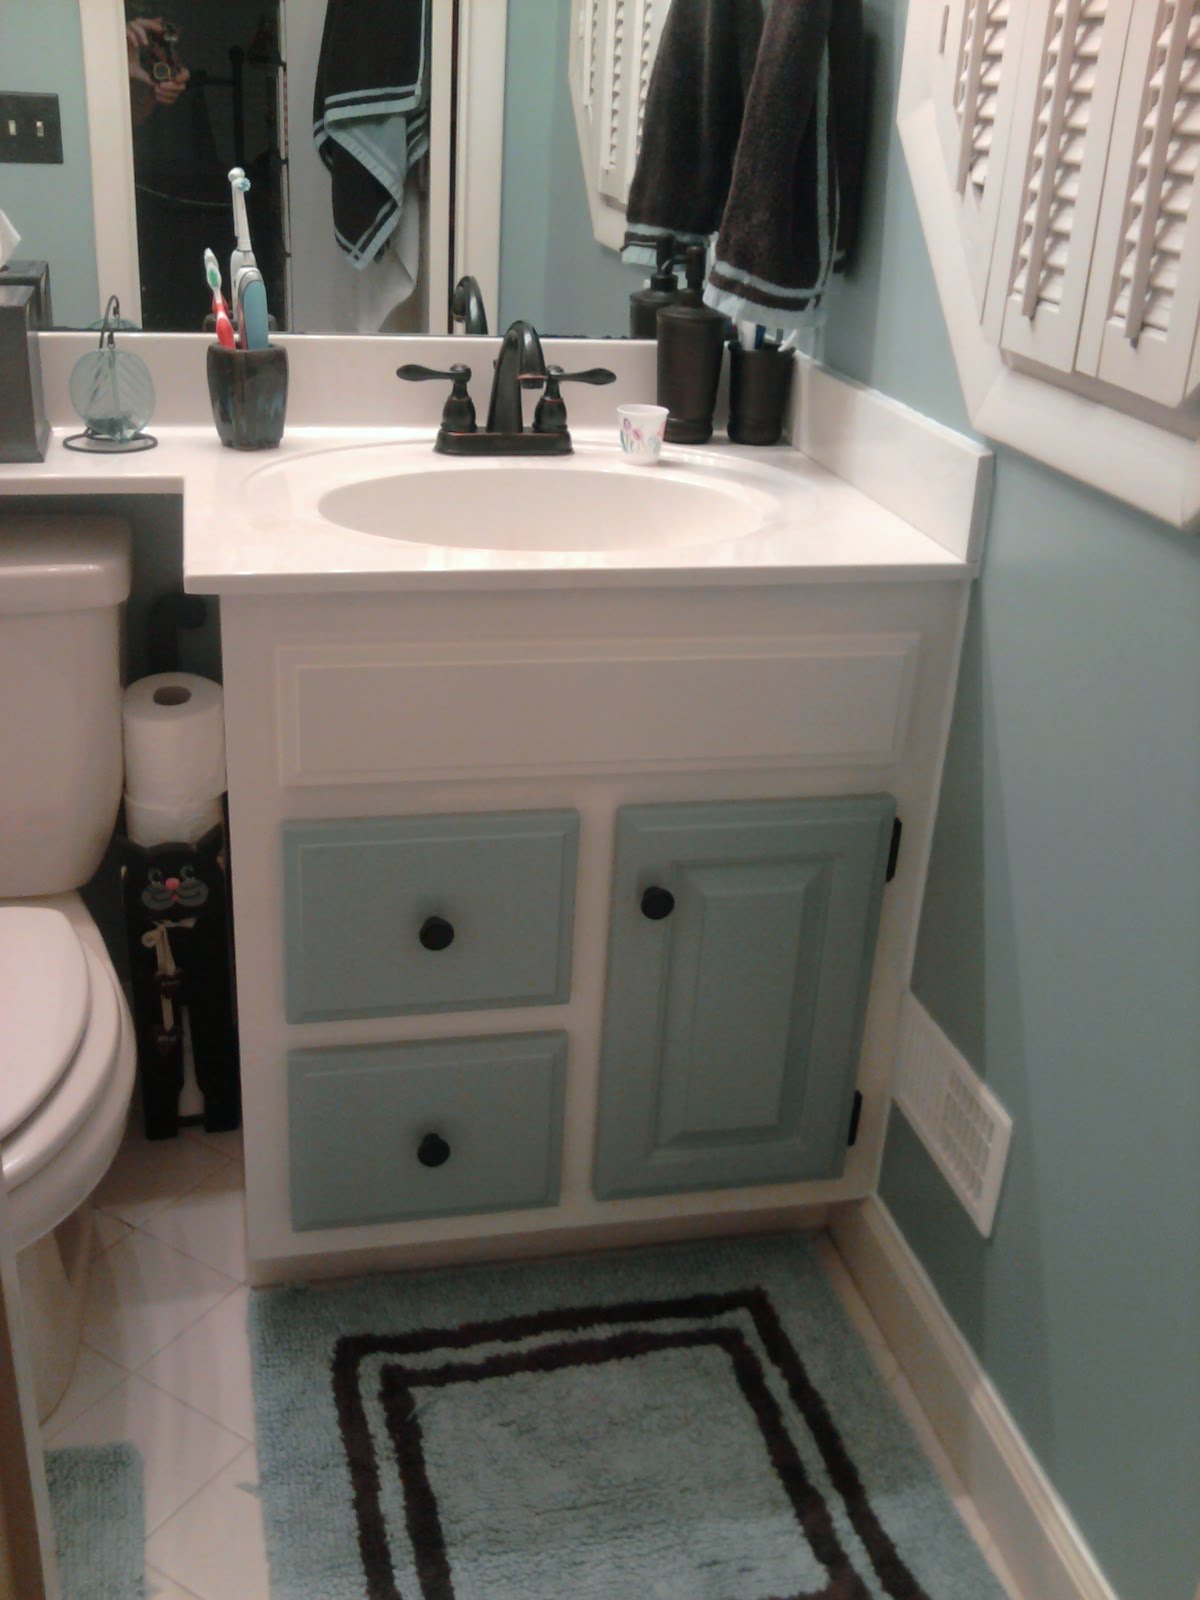
Now on to my bathroom. I painted the walls over the summer to match the blue/brown motif we have going on in the attached bedroom. I love that shade of blue. My plan was to paint the cabinet base in a dark espresso brown, paint the door and drawer fronts blue, and then texturize them with some brown glaze. It was cream colored with lots of scuffs and scratches, and it had a couple of places where I'd dripped hair color down the front of it and stained it. Oh, it also had fake brass hinges, drawer and cabinet pulls. I forgot to take the "before" picture until after I'd already removed the cabinet door (and I forgot to put away my flat iron too).

It should have been a piece of cake to do because it's so small. I might not have mentioned this before, but I have the smallest bathroom and the smallest closet in the family. But of course, right off the bat I ran into trouble. The screws holding the drawer fronts in place were totally stripped and I couldn't unscrew them. After trying every Phillips head screwdriver we own, and lots of brute force, I managed to get them off. However, the fake drawer thingy (what do you call those things?) was firmly attached. So I decided rather than tape it off and try to paint it the same blue as the real drawers, I would just leave it the same color as the base.
I couldn't find a brown that I loved enough to buy a whole quart of it to do such a tiny section of cabinet. I really wanted this project to be free (my favorite price) like the dresser (since I already had a can of spray paint) and I didn't want to have a nearly full quart of brown paint sitting around. Then I discovered two things that solidified my decision: one, the previous owner had used oil-based paint, so I could not paint over it with latex; two, there was still half a can of the cream-colored oil-based paint that the previous owner had used just sitting there, free (my favorite price) in the basement. Decision made, I sanded the worn spots on the cabinet base and applied another coat of the original paint just to freshen things up.
I took the hinges and door/drawer pulls off and painted them with my beloved oil-rubbed bronze. I sanded down the door and drawer fronts, primed them, and painted them with four coats of the blue wall paint. Yes, four coats. Ugh. The hardest part of the whole project was getting the drawer fronts off and back on again. Because of this fact, even though I don't absolutely love the way it turned out, it's staying this color for a while. I'm not taking those suckers off again any time soon. I thought I would really love the contrast between the blue and cream, but I'm not in love with it. I don't hate it, but it's not as awesome as I'd envisioned it. And it really bothers me that the fake drawer thingy is white but the real drawers are blue.

I really love the next picture because you can see my goofy hand in the mirror trying to avoid capturing my own image in the photo. Trust me when I tell you, I do not want the cyber world to see what I look like right now.

So, there's two more projects checked off my list. The others are much more time-consuming, requiring power tools and strength and skills that I don't possess. At least not by myself. I need to build a shelving unit in my laundry room to make it a proper mudroom, paint the whole room, rip up the Brady Bunch linoleum, and stain the concrete floor. Then I need to sand and repaint my front porch columns and gable, caulk the cracks and seal the concrete porch, repair the handrails and attach one side to the brick wall of the house for stability. Then I need to sand and paint all the shutters. I don't look forward to doing any of that alone. Yuck. I may have to break down and hire someone for that part of the list.
But at least I got some of the minor things crossed off the list this week. And I still have a few more days to tackle some more.
I still ♥ fall break.
I had two other projects working this week: one that was really easy and one that made me cuss. The easy one first. My 14 year old has had the same dresser set since he was still living in my belly and I filled it with baby clothes. Back then his clothes fit in the dresser drawers. Now, not so much.
I've been checking Craigslist every night and yard sales every weekend trying to find one tall (5-6 drawer) chest of drawers to replace the 4-drawer chest and 6-drawer long dresser that he has now, but I haven't found anything that I like which I can also afford. So, unfortunately for now, he's stuck with his kid-sized furniture to hold his man-sized clothes. But also unfortunately, they were fugly. They were scuffed and scratched and had these really awful fake brass drawer pulls. Well, see for yourself:

Old English Scratch Cover and Rust-oleum Oil Rubbed Bronze spray paint to the rescue. Both of those products are must-haves for me. I've used the Old English scratch cover on so many things--to erase a bunch of minor scratches in furniture when we moved, and more recently, to help me restore a Bombay Company jewelry chest which I've seen on Ebay and other sites for $100, that I scored at a yard sale for $5 this summer. It was in pretty rough shape, but with a little sanding and elbow grease and Old English, it is beautiful again.
Rust-oleum Univeral paint and primer in one is my go-to for anything that needs to be replaced when I can't afford to replace. Seriously, this stuff has saved me bundles of cash. I've painted (in two different houses) bathroom light fixtures , towel bars, toilet paper dispensers, drawer and cabinet pulls (see bathroom cabinet makeover, next), hinges, my metal (fake iron) bed, metal wall art, decorative crosses, picture frames, and probably some other stuff that I can't remember right now. I love this paint. It looks black at first glance, but when the light catches it, it gives off this really pretty glowy, gold-flecky, sparkly sheen that is so lovely.
So, back to the dresser. It's not a huge change (at least it doesn't show up well in the pictures), but it's enough that I can live with the chest of drawers a little while longer until I find something better. And then when I sell the old ones on Craigslist, somebody will get a less fugly pair for their kid's room. Win, win. Here is the finished product:

Now on to my bathroom. I painted the walls over the summer to match the blue/brown motif we have going on in the attached bedroom. I love that shade of blue. My plan was to paint the cabinet base in a dark espresso brown, paint the door and drawer fronts blue, and then texturize them with some brown glaze. It was cream colored with lots of scuffs and scratches, and it had a couple of places where I'd dripped hair color down the front of it and stained it. Oh, it also had fake brass hinges, drawer and cabinet pulls. I forgot to take the "before" picture until after I'd already removed the cabinet door (and I forgot to put away my flat iron too).

It should have been a piece of cake to do because it's so small. I might not have mentioned this before, but I have the smallest bathroom and the smallest closet in the family. But of course, right off the bat I ran into trouble. The screws holding the drawer fronts in place were totally stripped and I couldn't unscrew them. After trying every Phillips head screwdriver we own, and lots of brute force, I managed to get them off. However, the fake drawer thingy (what do you call those things?) was firmly attached. So I decided rather than tape it off and try to paint it the same blue as the real drawers, I would just leave it the same color as the base.
I couldn't find a brown that I loved enough to buy a whole quart of it to do such a tiny section of cabinet. I really wanted this project to be free (my favorite price) like the dresser (since I already had a can of spray paint) and I didn't want to have a nearly full quart of brown paint sitting around. Then I discovered two things that solidified my decision: one, the previous owner had used oil-based paint, so I could not paint over it with latex; two, there was still half a can of the cream-colored oil-based paint that the previous owner had used just sitting there, free (my favorite price) in the basement. Decision made, I sanded the worn spots on the cabinet base and applied another coat of the original paint just to freshen things up.
I took the hinges and door/drawer pulls off and painted them with my beloved oil-rubbed bronze. I sanded down the door and drawer fronts, primed them, and painted them with four coats of the blue wall paint. Yes, four coats. Ugh. The hardest part of the whole project was getting the drawer fronts off and back on again. Because of this fact, even though I don't absolutely love the way it turned out, it's staying this color for a while. I'm not taking those suckers off again any time soon. I thought I would really love the contrast between the blue and cream, but I'm not in love with it. I don't hate it, but it's not as awesome as I'd envisioned it. And it really bothers me that the fake drawer thingy is white but the real drawers are blue.

I really love the next picture because you can see my goofy hand in the mirror trying to avoid capturing my own image in the photo. Trust me when I tell you, I do not want the cyber world to see what I look like right now.
So, there's two more projects checked off my list. The others are much more time-consuming, requiring power tools and strength and skills that I don't possess. At least not by myself. I need to build a shelving unit in my laundry room to make it a proper mudroom, paint the whole room, rip up the Brady Bunch linoleum, and stain the concrete floor. Then I need to sand and repaint my front porch columns and gable, caulk the cracks and seal the concrete porch, repair the handrails and attach one side to the brick wall of the house for stability. Then I need to sand and paint all the shutters. I don't look forward to doing any of that alone. Yuck. I may have to break down and hire someone for that part of the list.
But at least I got some of the minor things crossed off the list this week. And I still have a few more days to tackle some more.
I still ♥ fall break.
What I Did Over Fall Break (part one)
Okay, so it's fall break and I have a week off to take care of all the little projects that stack up during the school year when my entire life is dominated by school stuff. I need these breaks throughout the year so I can catch up on housework and create something artsy to feed my artists' soul. If only I had more time, because my To To List, she is long and mighty.
First, I'm cleaning the whole house. It's a work in progress because I hate cleaning and can only do so much at a time. It's way overdue for a scrubbing. Kinda like Johnny Depp. Euw. Somebody needs to flea dip and groom that boy. Speaking of which, I did that to Lily the other day. She had a total doggie spa day: bath, conditioner, flea dip, nails trimmed, ears cleaned, teeth brushed, and doggie mouthwash generously applied. Then she came home and rolled in something and ate goose poop. Sigh.
Next, I made a chair. Well, I didn't really MAKE the chair, but I recovered an old one. I was trying to copy a chair I'd seen "on sale" for $399 at Price Point furniture's going out of business sale. Since there's no flippin' way I'm going to pay $400 for one stinkin' chair, I shopped around a little more. I found this one.
It was on clearance at Kirkland's for $99, but that was still too much to pay. Plus, the French cut of the wood on this chair didn't really fit with the music room slash man cave decor. But, I loved the zebra print fabric and black frame. I started thinking about what I already had at home that I could fix up to work. I remembered an old chair used to be in my dad's office when he worked for Dictaphone. I'd recovered it once before when we lived in Smyrna to match the boys' playroom in the old house. The original chair was covered with mustard yellow pleather and upholstery (right out of the seventies, kinda like the linoleum floor you can see in my laundry room in that picture, which is also on my projects list), so I covered it with denim and red trim. Here's how it looked before:
 It had about a million staples in it, so they all had to be removed, by hand of course, to take the blue fabric back off.

My hand was aching by the time I had them all out, but it was worth it.
After taking off the seat and back, I sanded and primed the wooden frame. I painted it with Benjamin Moore low luster black paint because I wanted that Pottery Barn look instead of a glossy black sheen.

After about a million coats of black paint, the frame looked really good. During that time I also painted an old end table that we got for free (my favorite price) back in Smyrna when one of our neighbors moved away and left it sitting by the curb. It was brown and didn't match the black/red music room, so we've been covering it with a black tablecloth, and Dan keeps his mixing board on it. After a few dozen coats of black paint, we don't have to cover it up anymore. It's missing the cross bars that are supposed to connect the legs, but that's actually a good thing because we always stored a box full of sheet music underneath, concealed by the tablecloth, and the missing crossbar made it easy to slide the box out. Now that box is in the closet because the table is too cute to cover up. If only I could hide all those blasted cords. They are the biggest draw back to having a music studio in the house. Wires and cords are EVERYWHERE!
So, back to the chair. The inspiration chair ranged from $99 atKirkland's to $400 at Price Point. I spent $15 on paint (which I used for more than one piece of furniture and still have plenty left for more projects), and $15 for a yard of zebra print fabric. I reused the red corded piping that I had on the free (my favorite price) chair when it was blue. So, for a grand total of $30, here is my finished chair:


Isn't it great? Can't you just see me sitting in it to practice my bass guitar? I love this chair!
It looks reall y great in the room, especially photographed in front of the new loveseat. Oh, did I mention that we finally bought some grown up furniture? After years of using hand-me-downs, slip covers, and garage sale furniture in the music room, we went to Price Point's sale (where I first saw the original inspiration chair) and bought a double reclining MATCHING couch and loveseat. We haven't bought matching furniture since before my 14 year old was born. I wanted a really pretty black leather set, but this gray corduroy feels like you just cuddled up in a giant fuzzy cloud. We went with comfort
  over style, since it's the man cave/music room.
Then I scoured all the stores in Hendersonville to find some red, black, and gray toss pillows to go with it. I found the gray pleated pillows at Target on sale for about $10 each (I can't remember the exact price). Then I found the red ones at Ross on clearance for only $6.48 each SCORE! They're actually reversible too, so I can have red with black embroidery or black with red. I prefer the red because the colors pop against the dark gray fabric.
I will have to write another post with the other projects I'm doing this week, because the paint isn't completely cured yet on my bathroom cabinet project. More to come.
I ♥ fall break!
First, I'm cleaning the whole house. It's a work in progress because I hate cleaning and can only do so much at a time. It's way overdue for a scrubbing. Kinda like Johnny Depp. Euw. Somebody needs to flea dip and groom that boy. Speaking of which, I did that to Lily the other day. She had a total doggie spa day: bath, conditioner, flea dip, nails trimmed, ears cleaned, teeth brushed, and doggie mouthwash generously applied. Then she came home and rolled in something and ate goose poop. Sigh.
Next, I made a chair. Well, I didn't really MAKE the chair, but I recovered an old one. I was trying to copy a chair I'd seen "on sale" for $399 at Price Point furniture's going out of business sale. Since there's no flippin' way I'm going to pay $400 for one stinkin' chair, I shopped around a little more. I found this one.

It was on clearance at Kirkland's for $99, but that was still too much to pay. Plus, the French cut of the wood on this chair didn't really fit with the music room slash man cave decor. But, I loved the zebra print fabric and black frame. I started thinking about what I already had at home that I could fix up to work. I remembered an old chair used to be in my dad's office when he worked for Dictaphone. I'd recovered it once before when we lived in Smyrna to match the boys' playroom in the old house. The original chair was covered with mustard yellow pleather and upholstery (right out of the seventies, kinda like the linoleum floor you can see in my laundry room in that picture, which is also on my projects list), so I covered it with denim and red trim. Here's how it looked before:
 It had about a million staples in it, so they all had to be removed, by hand of course, to take the blue fabric back off.
My hand was aching by the time I had them all out, but it was worth it.
After taking off the seat and back, I sanded and primed the wooden frame. I painted it with Benjamin Moore low luster black paint because I wanted that Pottery Barn look instead of a glossy black sheen.

After about a million coats of black paint, the frame looked really good. During that time I also painted an old end table that we got for free (my favorite price) back in Smyrna when one of our neighbors moved away and left it sitting by the curb. It was brown and didn't match the black/red music room, so we've been covering it with a black tablecloth, and Dan keeps his mixing board on it. After a few dozen coats of black paint, we don't have to cover it up anymore. It's missing the cross bars that are supposed to connect the legs, but that's actually a good thing because we always stored a box full of sheet music underneath, concealed by the tablecloth, and the missing crossbar made it easy to slide the box out. Now that box is in the closet because the table is too cute to cover up. If only I could hide all those blasted cords. They are the biggest draw back to having a music studio in the house. Wires and cords are EVERYWHERE!
So, back to the chair. The inspiration chair ranged from $99 atKirkland's to $400 at Price Point. I spent $15 on paint (which I used for more than one piece of furniture and still have plenty left for more projects), and $15 for a yard of zebra print fabric. I reused the red corded piping that I had on the free (my favorite price) chair when it was blue. So, for a grand total of $30, here is my finished chair:


Isn't it great? Can't you just see me sitting in it to practice my bass guitar? I love this chair!
It looks reall
 y great in the room, especially photographed in front of the new loveseat. Oh, did I mention that we finally bought some grown up furniture? After years of using hand-me-downs, slip covers, and garage sale furniture in the music room, we went to Price Point's sale (where I first saw the original inspiration chair) and bought a double reclining MATCHING couch and loveseat. We haven't bought matching furniture since before my 14 year old was born. I wanted a really pretty black leather set, but this gray corduroy feels like you just cuddled up in a giant fuzzy cloud. We went with comfort
  over style, since it's the man cave/music room.
Then I scoured all the stores in Hendersonville to find some red, black, and gray toss pillows to go with it. I found the gray pleated pillows at Target on sale for about $10 each (I can't remember the exact price). Then I found the red ones at Ross on clearance for only $6.48 each SCORE! They're actually reversible too, so I can have red with black embroidery or black with red. I prefer the red because the colors pop against the dark gray fabric.
I will have to write another post with the other projects I'm doing this week, because the paint isn't completely cured yet on my bathroom cabinet project. More to come.
I ♥ fall break!
Subscribe to:
Posts (Atom)

